
Like many others I’d been using f.lux, the popular anti-insomnia blue light filter app, to reduce computer vision syndrome (CVS) caused by blue light. f.lux had been the best in its superior approach to filtering blue light. Iris is the novel blue light filter app designed specifically to reduce computer eye strain. It filters blue light using the same approach as f.lux. In insomnia prevention, the two apps appear similar. To CVS sufferers Iris offers more.
Since there are already several articles about f.lux on Glarminy (see here, here, and here) the focus of this article will be on Iris and how it compares to f.lux (in anti-CVS effectiveness). Six other popular blue light filter apps are also mentioned. These are not considered as the best for CVS prevention because of an inferior blue filtering technique. The article first mentions the functionalities that Iris and f.lux do equally well. Next, the anti-CVS capabilities offered in Iris but not in f.lux are described. Finally, the article reveals the functionalities that could potentially help reduce computer eye fatigue but are yet to be fully implemented in Iris.
The two blue light filter apps: A brief overview
f.lux: Free, simple to use for insomnia, a bit trickier for CVS. If your objective is only to fight digital screen induced insomnia and you want it for free f.lux is your best blue light app because it provides a greater range of CCT settings than the free versions of Iris.
Iris Mini (download free): limited blue light filtering capacity and brightness control, no other anti-CVS functionalities. Good to get an impression of the app.
Iris Mini Pro (purchase license here): Minimalistic, simple to use. Among the many hidden features, two stand out as great value for CVS sufferers: the color invert, and unlimited blue light control. Perfect against CVS and/or insomnia if you principally need blue light, and/or brightness control, and/or color invert.
Iris (download free): More comprehensive user interface – all features are explicit (not hidden as with Iris Mini Pro). It features a timer – break reminder. A slightly wider selection of blue blocking rates and brightness control than Iris Mini, including 0K CCT and Color invert functions. But it is still quite limited.
Iris Pro (purchase license here): More tools to relieve CVS (plus a few new ones to be implemented) than any other blue light app. There are also many additional features not related to CVS or Insomnia. It is great for both CVS and/or insomnia. Purchasing the license now entitles you to all future updates.
Finally, a blue light app designed to relieve computer eye strain
Computer blue light is an important cause of eye strain in many people. But there is a lot more to CVS than blue light, e.g. avoiding flicker, taking breaks, doing eye exercises, setting a limit to daily screen exposure, etc. Until Iris there hadn’t been any good blue light filter apps able to take care of it all. The only way to be fully covered had been to combine two pieces of software: a blue light filter app (e.g. f.lux) and an anti-Repetitive Strain Injury app (e.g. Workrave) to help with the rest. However, since f.lux is insomnia centered its interface always felt a bit awkward to be used for CVS prevention. So, Iris with its focus on computer induced, chronic eye fatigue is great news. Furthermore, Iris on its own offers more than f.lux and Workrave combined!
Blue light filter apps reduce blue light emissions
Blue light filter apps alter the colors displayed on a screen such that less blue light is emitted (they don’t block or filter emitted blue light). However blue light filter app, blue light app, and blue light filter for PC are generally accepted terms and thus used interchangeably in this article.
Comparing blue light apps and physical blue light filters
On most (if not all) screens, it is impossible to completely eliminate blue light emissions with a blue light filter app, i.e. through software/electronic manipulation. However, with very low correlated color temperature (CCT) settings, e.g. 1900K or 1200K, it is possible to get relatively close (see table below).
If you are very blue light sensitive you might be better off using physical filters: blue blocking glasses or screen filters because the good ones can ensure near 100% blue light blocking rates. For example, I’ve been able to increase my daily exposure to computer screen by a good 20% and reduce the frequency of my brakes (without any increase in CVS symptoms) when, 6 months ago, I started wearing blue-blocking glasses (cutoff at ~500nm) in addition to running f.lux/Iris at 2700K, as I had been doing before.
Table: Proportion of blue light filtered by f.lux at different Correlated Color Temperature (CCT) settings on selected digital screen devices. Source: Fluxometer. Note that other blue light apps may achieve different blue light filtering rates at similar/same CCT settings. (Based on my observations, not measurements, it appears that Iris’ blue light blocking rate is similar to that of f.lux for the same CCT settings).
| Device | 3400K | 2700K | 2300K | 1900K | 1200K |
|---|---|---|---|---|---|
| Asus Transformer Pad | -51% | -67% | -76% | -85% | -94% |
| GalaxyNexus | -58% | -72% | -80% | -87% | -97% |
| GalaxyS5Active | -63% | -77% | -85% | -91% | -98% |
| Kindle Fire | -55% | -71% | -79% | -87% | -96% |
| Nexus 10 | -62% | -76% | -83% | -90% | -96% |
| Nexus One | -63% | -78% | -85% | -91% | -98% |
| Nokia Lumia 521 | -69% | -83% | -87% | -91% | -97% |
| Retina Macbook Pro 2014 | -60% | -74% | -81% | -88% | -96% |
| Surface Pro 3 | -61% | -74% | -82% | -87% | -96% |
| Thinkpad T510 FHD | -55% | -69% | -77% | -84% | -95% |
| iPad Pro | -60% | -74% | -81% | -88% | -96% |
| iPad mini Retina | -62% | -76% | -83% | -89% | -96% |
| iPhone 6+ | -60% | -75% | -82% | -88% | -97% |
| iPhone 6 | -60% | -74% | -82% | -88% | -97% |
Disclaimer: I am very sensitive to computer screens, particularly computer blue light. So keep in mind that this article on best blue light filter apps is written by a demanding user. However, I am not a vision expert.
Disclosure: You can help sustain Glarminy (at no cost to you) if you go to Iris by clicking on any links within this article and purchase Iris Pro or Iris Mini Pro. Thanks!
I purchased my Iris Mini Pro and was offered Iris Pro license free of charge.
Important anti-CVS features offered in Iris and f.lux
Iris and f.lux do some things equally well: They both filter blue light at a minimum loss of contrast and they both provide flicker free brightness reduction.
The best blue light filtering approach
Both blue light and low contrast make your eyes strain more which may cause computer eye fatigue. When you use software to reduce blue light emissions of your screen you are bound to lose some contrast. When it comes to CVS, what separates the best blue light filter apps from the rest is their approach to filtering blue light.
There are two approaches for filtering blue light: the transparent overlay approach and the color transform approach. Color transform preserves contrast considerably better (see the explanation of the maker of f.lux, with numbers to prove it).
f.lux and Iris use the superior, color transform, approach (and are the only blue light filter apps that do so. Please let me know if you know of another!?). Hence, they are considered as the best blue light apps for CVS prevention in this article.
(Sadly, it is not possible to use color transform approach on Android. For that reason, you cannot get f.lux for Android. Iris for Android uses transparent overlay.)
Other blue filter apps: They use transparent overlay and focus on insomnia
There are many blue light filter apps in the market. They tend to focus on sleep disruption, not computer eye strain prevention. Moreover, they use the inferior, transparent overlay approach to filter blue light (previous section). However, judging by their popularity, transparent overlay must be tolerable by those who need a blue light filter app primarily to improve their sleep.
Apparently, in some people, low contrast doesn’t aggravate CVS symptoms. Although, it could be a matter of time before these users start feeling it (remember that CVS is a chronic condition). It is also possible that these people never will suffer from low contrast-induced eye fatigue: In developing chronic eye strain it is not the same to use a blue light app all the time (CVS) or just for two-three hours when using a computer before going to bed (insomnia).
Here is a list of 6 more popular blue light filter apps if you’d like to see what unique features they offer:
- G.lux – free; for Google Chrome
- Night Shift – free; for Apple
- PC SunScreen – £5; for Windows
- Redshift – free; for Windows, Apple Mac, or Linux
- SunScreen –free; for Windows
- Twilight – free; for Android
Flicker-free brightness control
Iris and f.lux offer flicker-free brightness control. This is very useful because many digital screens flicker at lower brightness levels thus causing CVS in some people. Yet lowering screen brightness is unavoidable. Either you need to adjust screen’s brightness to the general level of lighting, or your light sensitive eyes just can’t take high brightness output or both.
Digital screen high-frequency flicker is a frequent cause of eye strain and headaches in people who are more sensitive to it. Flicker is a rapid and repetitive variation in light source output (between ON and OFF, or higher and lower brightness). High-frequency flicker is invisible to our eyes, however, our brain still detects it and in some people leads to eye strain and headaches.
Flicker is often worse when a screen is being used at lower brightness levels. This is due to the use of Pulse Width Modulation (PWM) to control screen brightness. PWM is a method used to reduce the perceived brightness by making the OFF (or lower brightness) longer at the cost of the ON (or higher brightness) state. The resulting flicker is still invisible as such. Instead, what we perceive is lower screen brightness. (For more info on flicker see this presentation or this leaflet by U.S. Department of Energy).

Examples of Pulse Width Modulation (PWM). Source U.S. Dept. of Energy. The % on the right refer to the brightness level. Brightness is reduced by keeping the source of light in the OFF state longer relative to the ON state.
(Techsensitive is a valuable source of information on how much different video display devices flicker at different brightness levels and how much blue light they emit).
In Iris and f.lux brightness control is flicker free because it uses a different approach to controlling brightness. The screen is made darker by “moving the white point” to a shade of gray. The effect is similar to putting on a pair of gray-tinted glasses.
The beauty of this approach is that it allows you to keep your screen at full, flicker free, brightness and yet it is darker.
Inevitably the downside of any dimming is the loss of contrast. If you overdo it your eyes will feel it sooner or later. For that reason, Iris or f.lux brightness control is more suitable for black text on light backgrounds, white in particular.
If you prefer to use a darker background this method of brightness control may be a bit less suitable, but Iris also has a solution for you – see section on Color inversion and color effects below.
Important anti-CVS features available in Iris but not in f.lux
To people who suffer from computer eye strain Iris offers several CVS-reducing features that are not available in f.lux: maximum customizability of blue light output, color inversion and color effects, timer and break reminder, automatic brightness control, and font rendering.
Iris allows maximum customizability of blue light filtering effectiveness
Iris is the only blue light app that allows maximum customizability of screen’s blue light emissions (Iris Pro and Iris Mini Pro). In Iris Mini Pro Correlated Color Temperature (CCT) customization is a hidden feature. You can set the blue light app to any CCT value you want, from 6,500K all the way down to 0K – zero blue light.
In f.lux CCT settings go as low as 2700K. It is possible to enable lower CCT settings (2300K, 1900K, and 1200K) but these only apply to night time. (You can get around this limitation by setting the clock on your computer such that f.lux thinks it is night time when you normally use your computer screen. For example, you could move your PC clock 12 hours ahead.
Note also that Iris Pro allows CCT settings above 6500K (extended values): up to 10,000K! This feature is best avoided for the sake of your eyes’ wellbeing. (It is available for those who might need the extra blue light to keep them from falling asleep while doing computer work).
Color inversion and color effects
If you work in a relatively dark room (as I must to avoid on-screen glare and reflections) or just prefer black background on your screen, you can use the color inversion function (a hidden feature in Iris Mini Pro). Color inversion makes your screen look like its negative.
If you normally use black text on white background and you turn on the inverted mode, the contrast between white text and black background may feel uncomfortably glary. You can soften the contrast by lowering blue light settings (CCT). In the extreme, you can use zero blue light (hidden feature in Iris Mini Pro), which will make your text red. (Iris Pro offers some additional, pre-set color options – see Screen Effects, Color Scheme or Types).
f.lux offers a reduced version of color inversion. It is called Darkroom Mode and is limited to the red color effect: white pixels are changed to black and the black ones to red. The colors in between are converted to some shade of red – so your black text on a white background will appear as red text on black background. To turn it on click: options > Darkroom Mode.

Color inversion may be very useful in some programs and settings. However, as you can see in the image above, the color inversion may make some fields (like the menu bar in the image above) too bright for long term visual comfort. Elsewhere (menu bar on the left) the contrast between the different shades of red may be uncomfortably low. Moreover, it appears that some people find black background psychologically unpleasant. Therefore for long hours of text editing or spreadsheet work, it might be preferable to use a combination of customizing your colors (see this article for Windows 10) and reducing blue light with Iris/f.lux.
However, remember that blue light apps distort colors and also limit your color selection to a degree. Therefore, if you want your background color to be some non-black color, make sure you set your blue light filter app to the desired CCT setting first and then find the color you like. If, you reverse the order (turn your blue light app on after you’ve set the colors) you run the risk of being disappointed with the colors and/or contrast when the blue light reducing color transformation takes place.
Break reminding and timer
Taking breaks is good for your eyes and body. The eyes are particularly challenged and under a lot of stress when reading from a screen. Giving them time to relax by focusing on distant objects is another key anti eye fatigue measure. The timer implemented in Iris can help remind you to give your body and eyes a break. Alternatively, you can use one of many other anti-repetitive-strain apps in combination with f.lux or Iris Mini but it might be handier to have it all in one app.
The Iris Pro timer allows you to set the frequency of your breaks (the default is every 30 min) and break duration (default: 3min). Moreover, you can also: set the postpone time; whether you want the rest screen to close automatically; and whether you want to use sounds.
Iris also offers three different modes called Timer types: Normal, Strict, and Productive. The Strict mode doesn’t allow you to skip brakes (the screen is locked for the duration of a break). The Productive mode displays a timer in the bottom right corner of your screen to push your productivity by makes you feel like you are working against the clock.
What I would love to see implemented in Iris’ timer is total time spent in front of a screen in a day. For some of us, it is important not to spend too much time in front of a screen on any given day in order to avoid dry eyes and eye strain. It may also increase eye comfort when one takes longer breaks thus spreading computer screen exposure throughout the day. In that scenario, it is so much easier to keep track of the total daily screen exposure time with an app (Workrave, the anti-repetitive-strain-injury app I’ve been using, does that very nicely).
Automatic brightness control
Automatic brightness may also help a lot in reducing eye strain. As chronic eye fatigue develops one may become much more sensitive to minimal glare, i.e. very small contrasts in brightness. For example, if a cloud covers the sun, your office will suddenly become a bit darker. For most, it is business as usual, but to a CVS sufferer, the screen will be too bright. If you realize it on time you can manually lower screen’s brightness and no harm is done (except for the trouble of changing screen brightness each time natural light conditions change). It is a lot worse if the change room brightness goes unnoticed (which can easily happen to a concentrated worker). In due time, and definitely by the end of the day you feel your CVS symptoms worsen.
So, if you happen to work in an office depending largely on natural lighting, you should definitely consider switching on Use automatic brightness, under the Artificial Intelligence (AI) heading in Iris Pro.
Text-rendering (and font selection): Aesthetics vs. visual comfort
Font selection is extremely important to avoid computer eye strain and headaches. Unfortunately, it seems impossible to find conclusive research on which font and text-rendering method provides greater visual comfort. Given this void, Iris Pro tries to help by making it very easy to switch between different text-rendering methods. In that way, you can easily compare what works best for you and on your screen/computer setup.
To choose font and text-rendering optimally, you first have to be clear on what is more important to you: aesthetics or visual comfort. Given the available screen technology, you may be forced to choose. Unfortunately, what looks better is frequently more eye straining. This is principally due to the low resolution of computer screens – most screens have about 100 dots per inch (dpi), even the highest resolution retina displays have about 300 dpi which is still far below print at about 1000 dpi. Unfortunately, UI and web designers tend to give priority to aesthetics. It makes sense, that’s their job. But as a consequence, we are stuck with blurry character images and computer eye strain.
Aliased, greyscale antialiasing and sub-pixel text rendering – magnified (Source: annystudio.com). When normal size, the fonts further on the right look better (see also the next image), but the font on the left is much more eye-friendly because there is no fuzziness and the eyes don’t constantly strain to focus the un-focusable. Also, notice the blue shade to the right of the character on the right. That is the eye-straining blue light!?

A word Pixels displayed in a normal font and anti-aliased font, and the same word enlarged 12 times. Colored “fringes” around anti-aliased text are obvious; it’s uncomfortable to read and harmful to vision. (Source: annystudio.com). But let’s be honest, when small the fuzzy word looks better. However, the enlarged image can help you appreciate the mess your eyes are constantly trying to put in focus without ever succeeding!
When you start to care about CVS what you want on your screen is a font that is easy to focus on, i.e. one that looks crisp, sharp. No fuzziness or shades at the edges. No unnecessary embellishments, i.e. serifs, that add to the fuzziness of the image and require more focusing and visual processing but don’t add any information (see this article for more detail).
Among the many opinions the consensus seems to be that for greater visual comfort, Aliased Sans Serif font is best for on-screen reading.
Iris Pro provides an easy way to switch between different text rendering methods: Anti-aliasing fonts, GDIPP (Apple-like rendering for Windows), ClearType fonts, and Simple fonts. Try the different text-rendering methods and see which one works best for you and on your computer screen. After all, it could be that what is best for you does not depend only on the specifics of your visual system, but also on the specifics of the screen and color theme you are using.
I’ve become a fan of aliased Verdana (with ClearType fonts – fuzziness OFF, of course!). Verdana is not my favorite because I thought it was beautiful, but because it is the crispest on the laptop I usually use for work. Before deciding on Verdana I went through most of the fonts I have installed on my laptop and checked which one is visually the most comfortable. My top priority is definitely eye comfort. (Later I found out that Verdana was designed specifically for digital screens and with eye comfort in mind). In the case of many other fonts, like for example Times New Roman – very popular in print, they try to hammer into 100 (max 300) dpi (on computer screens) what looks good and reads well with 1000dpi (on paper)!?
Arial is another popular Sans Serif font (but I don’t find it nearly as comfortable as Verdana).
However, this is not to say that Verdana will also be the least straining on your computer screen. On the contrary, it is to say that you should experiment to find the optimal setting for you: try different fonts and use Iris Pro to switch between the different text-rendering methods. The same font isn’t necessarily equally crisp on different screens, operating systems, or with different color schemes. For example, Verdana doesn’t look as sharp on my second laptop. Nor is it as comfortable on my first laptop if I switch from orange text on a black background I normally use to black text on white background.
Promising (but not fully functional) anti-CVS Iris features
Blink detection
Blinking rate drops considerably when reading from a digital screen. A low rate of blinking may result in dry eyes (one of CVS symptoms) because the eye surface is not being nurtured, moistened, cleaned, protected, and lubricated often enough. (See this 4 min video on the different functions of tears). Therefore, any attempt to remind the user to maintain natural blinking rate is beneficial. Clearly, Iris wants to help, but…
I haven’t been able to understand how this capability of Iris Pro is supposed to work. Blink detection is turned on under the Artificial Intelligence heading. In the bottom right corner of your screen, you get an Iris field with a camera icon, eye icon, and a number next to it. In my case, this number was constantly 0 except for a few instances when it briefly switched to 1.
When you also click on Show blink screen a larger window with a video image of the user appears in the same bottom right corner area of the screen. It seems as though the app is trying to track down the user’s face (it draws a rectangle around it) and also the users’ eyes… What is not clear is what is supposed to happen then?!?
I’ve also noticed that when turned on blink detection slows down my laptop considerably.
The explanation of how Iris helps you to blink more is unfortunately still on Iris to-do list, but this tool could become very helpful and popular when fully implemented!
Magnification
Magnification could potentially prove useful, but I couldn’t get it to do anything either with Zoom-in or Zoom-out (the Magnification help page offers no explanation).
Exercises
Suggesting exercises for the eyes, neck, back, etc. could also prove useful to some CVS sufferers. Many anti-repetitive strain injury apps do that. The Iris pricing page features exercises as one of the capabilities of Iris Pro, but it is not to be found on the Iris Pro menu.
My experience with Iris and Iris Mini
I tested four versions of Iris (for Windows): Iris Mini, Iris Mini Pro, Iris and Iris Pro. The Pro versions are not free, but not expensive either considering how much they can help you improve computer eye strain.
Iris Mini (free download here) provides limited blue light and brightness control options but enough if you are not very sensitive to computer light and also enough to give you a flavor for the excellent, minimalistic simplicity of Iris Mini Pro.
In Iris Mini you are able to switch between three different modes:
- The Automatic mode is suitable to fight insomnia. In terms of blue filtering it does more or less the same as f.lux (if set to 6500K during the day and 3400K at night): reduces blue light by about 60% during the night while leaving it at 100% during the day. In addition, Iris Mini automatically reduces screen brightness at night to 80%.
- The Manual mode is for the blue light sensitive. It allows you to work with ~ 60% blue light reduction and 80% brightness at all times.
- The Paused mode: Iris is paused – no changes to blue light or brightness on your screen.
| Iris Mini Mode | CCT | Blue light filtered | Brightness |
|---|---|---|---|
| Automatic (day) | 6500K | 0% | 100% |
| Automatic (night) | 3400K | ~ 50-70% | 80% |
| Manual (day & night) | 3400K | ~ 50-70% | 80% |
| Paused | 6500K | 0% | 0% |
Sources: Iris, Blue light filtered rates estimated based on data from fluxometer
It is really easy and quick to switch between the modes. You just click on the Iris icon in your taskbar to move from Automatic mode to Manual. Click again to move to Paused mode and the next click brings you back to Automatic mode.
My immediate reaction was favorable; however, I’d been used to working with CCT at 2700K at all times, so the 3400K in the Manual mode felt too high. Also, the 80% brightness reduction felt uncomfortable with my usual orange text on black background. So, to gain access to setting customization I decided to purchase Iris Mini Pro.
Iris Mini Pro (purchase license here) was great! Simple, minimalistic, perfect. To move between the three modes you just click on the Iris icon on the taskbar. But in addition, it gives you access to 8 settings for blue light reduction, 4 settings for brightness and many other hidden features (full customization of blue light blocked and brightness, invert, etc.).
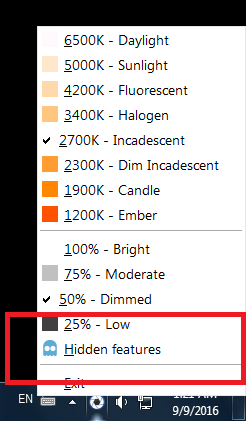
Iris Mini Pro user interface – the menu appears when you right-click the Iris icon on the taskbar.
However, I was missing a timer to remind me to take breaks so I installed Iris and got a license for Iris Pro.
Iris (free download here) is a bigger blue light filter app. The free version allows you to use its timer (with pre-set break frequency of every 30 minutes). You can also determine whether you want to use the timer in productive, strict, or normal mode.
Iris also offers a selection of 3 modes (automatic, manual, and paused) and 7 types as shown in the table below.
| Iris Mode | Iris Type | CCT | Brightness |
|---|---|---|---|
| Automatic (day) | Health Reading Overlay |
5000K | 100% |
| Sleep Biohacker |
0K | 100% | |
| Programing: inverted colors | 5000K | 100% | |
| Movie | 6500K | 120% | |
| Automatic (night) Manual (day & night) |
Health Reading Overlay |
3400K | 80% |
| Sleep Biohacker |
0K | 80% | |
| Programing: inverted colors | 3400K | 80% | |
| Movie | 6500K | 120% | |
| Paused | 6500K | 100% |
Iris Pro (purchase license here) is great, particularly for the more demanding users. As described above it gives you access to the best available anti-CVS blue light filter app.
Ps: If you find this review of Best blue light filter apps for visual comfort: Iris & f.lux useful, please consider LIKING, REBLOGGING, and/or SHARING it below.

Very nice.i got sufficiant and excellent information abaut tow top anti blue light apps and i am very so thankfull to you.
LikeLike